In this tutorial we will learn how to make an Arduino Robot Arm which can be wirelessly controlled and programmed using a custom-build Android application. I will show you the entire process of building it, starting from designing and 3D printing the robot parts, connecting the electronic components and programming the Arduino, to developing our own Android application for controlling the Robot Arm.
Using the sliders in the app we can manually control the movement each servo or axis of the robot arm. Also using the “Save” button we can record each position or step and then the robot arm can automatically run and repeat these steps. With the same button we can pause the automatic operation as well as reset or delete all steps so that we can record new ones.
Arduino Robot Arm 3D Model
To begin with, I designed the Robot Arm using Solidworks 3D modeling software. The arm has 5 degrees of freedom.

For the first 3 axis, the waist, the shoulder and the elbow, I used the MG996R servos, and for the other 2 axis, the wrist roll and wrist pitch, as well as the gripper I used the smaller SG90 micro servos.
You can download and the 3D model below.
Solidworks:
STL files for 3D Printing:
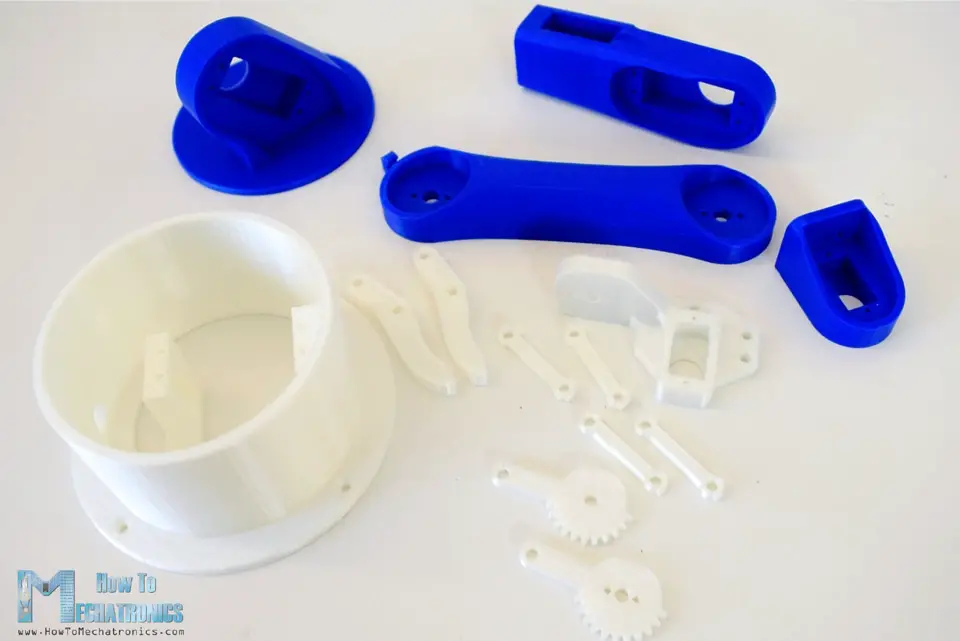
3D Printing the Robot Arm
Using my new 3D Printer, Creality CR-10, I 3D printed all of the parts for the Arduino robot arm.
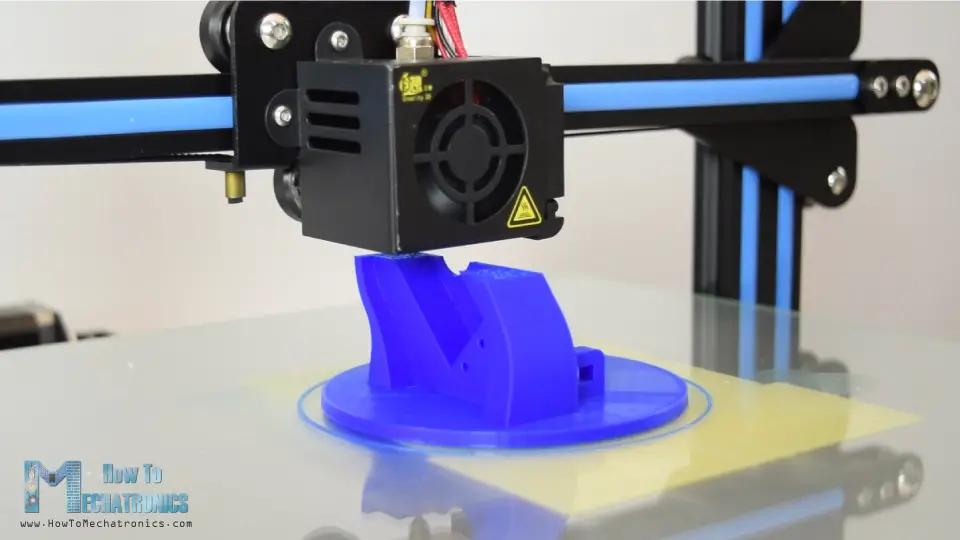
Here I would like to give a shout-out to Banggood.com for providing me this awesome 3D printer. The Creality CR-10 printing quality is amazing for its price point and what’s also great about it is that it comes almost 90% pre-assembled.
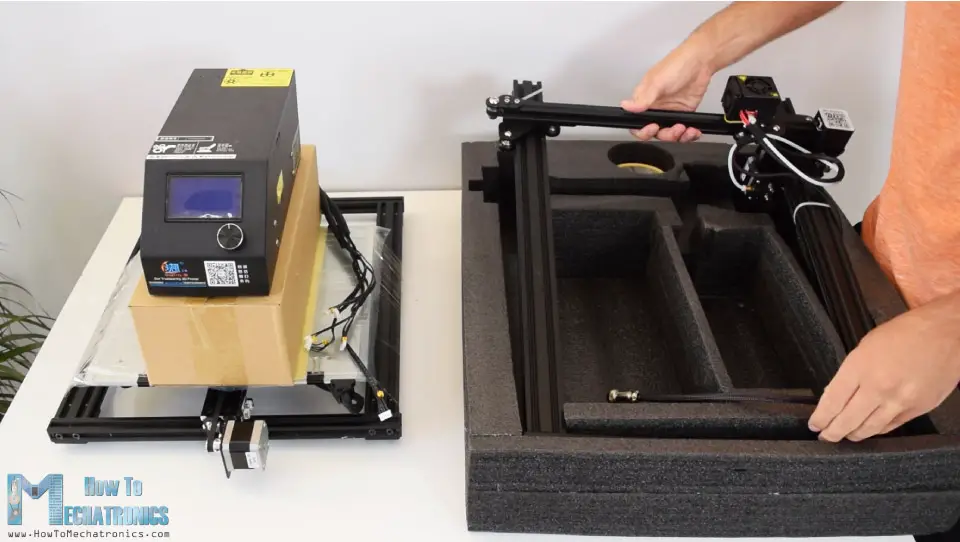
In order to complete the assembly we just have to connect the upper and lower parts frames using some bolts and brackets, and then connect the electronic components with the control box using the provided cables.
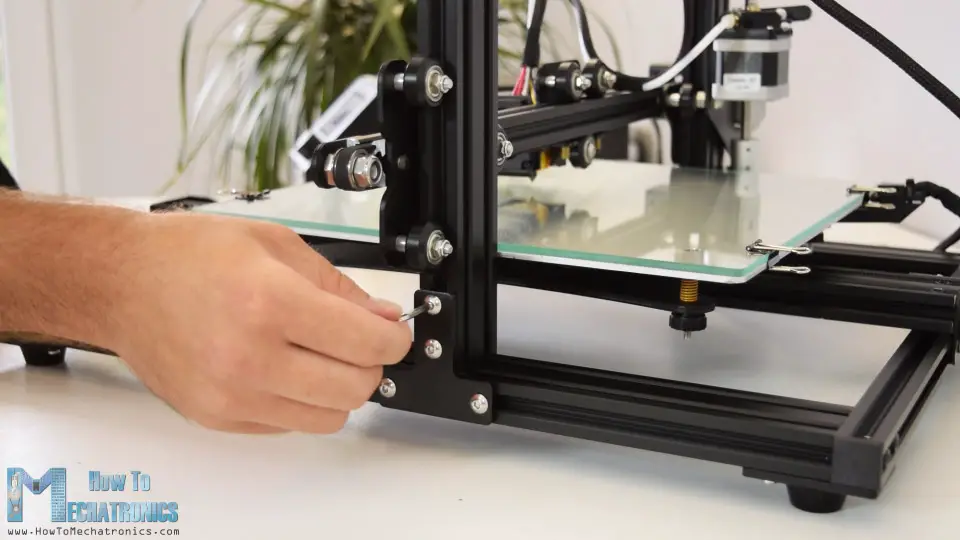
Before trying it, it is recommended check whether the roller wheels are tight enough, and if they are not, you can simply use the eccentric nuts to tight them up. And that’s it, after leveling your 3D printing bed, you are ready to transform your 3D creations into reality. I had all of the parts for the Arduino Robot Arm ready in just several hours.
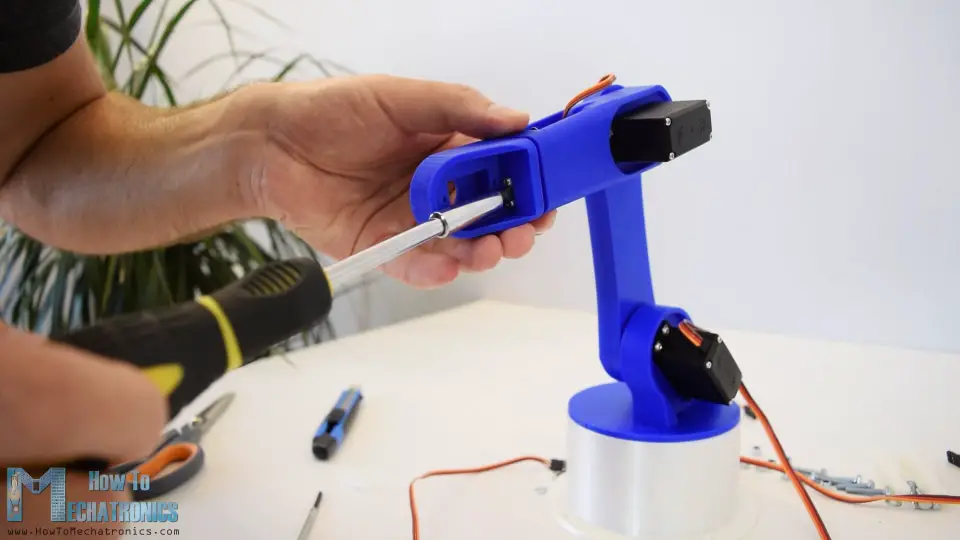
Assembling the Robot Arm
Ok, so at this point we are ready to assemble the robot arm. I started with the base on which I attached the first servo motor using the screws included in its package. Then on the output shaft of the servo I secured a round horn a bolt.
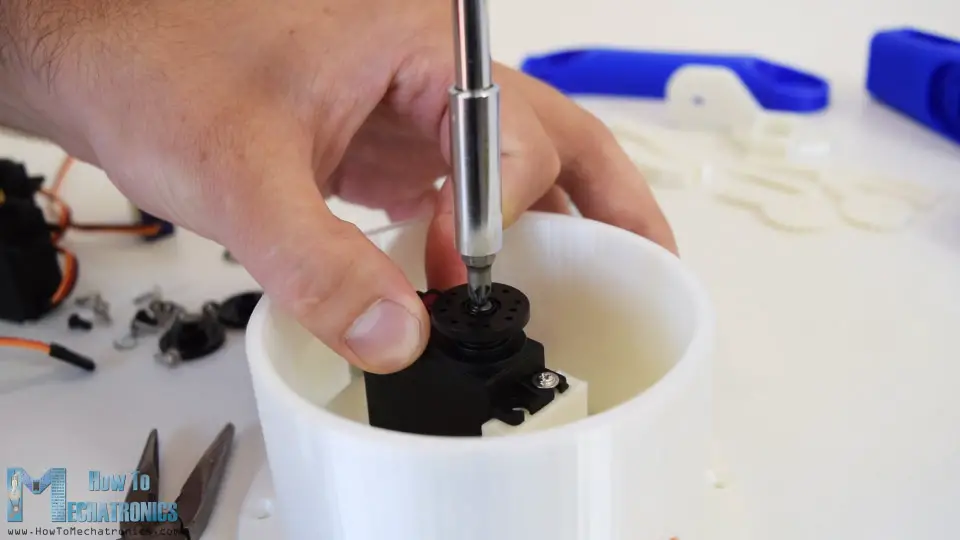
And on top of it I placed the upper part and secured it using two screws.
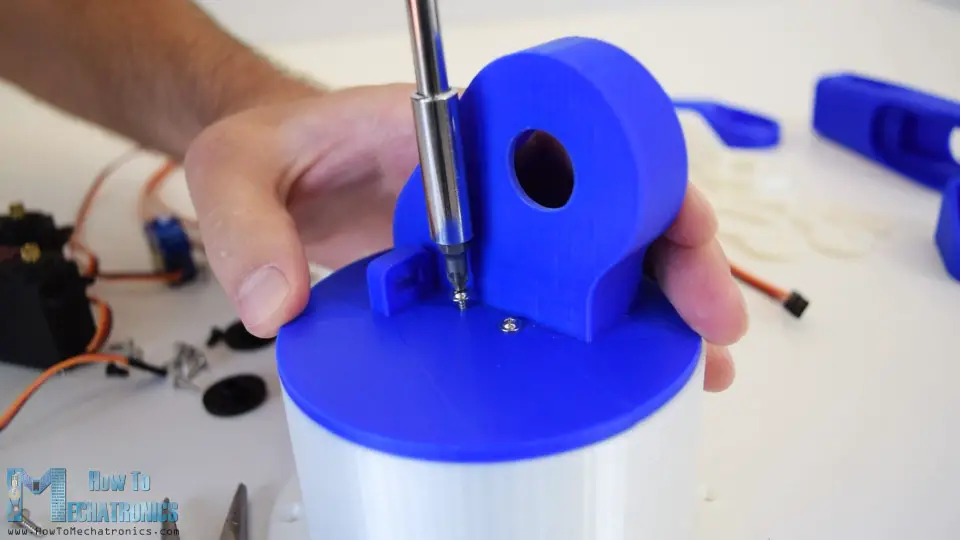
Here again first goes servo, then the round horn onto the next part, and then they are secured to each other using the bolt on the output shaft.
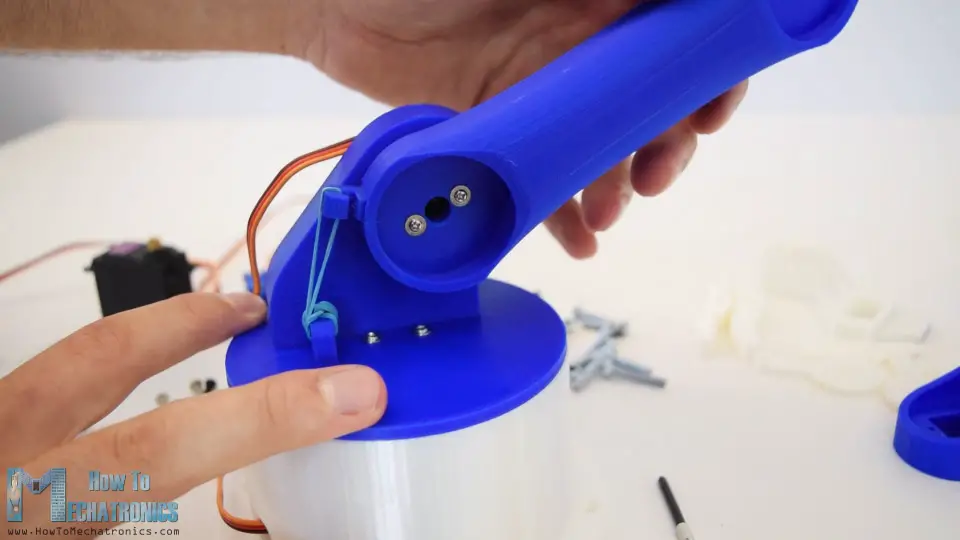
We can notice here that at the shoulder axis it is good idea to include some kind of spring or in my case I used a rubber band to give some help to the servo because this servo carries the whole weight of the rest of the arm as well as the payload.
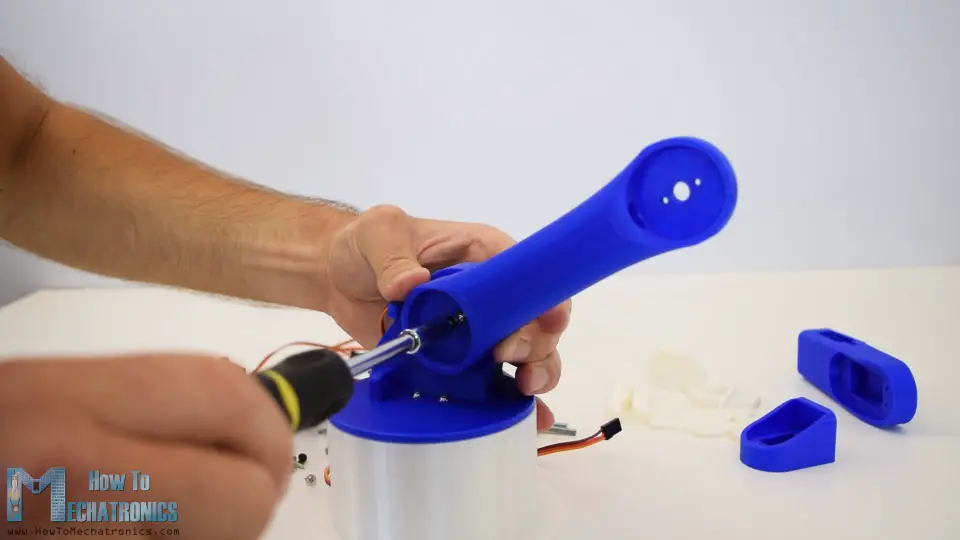
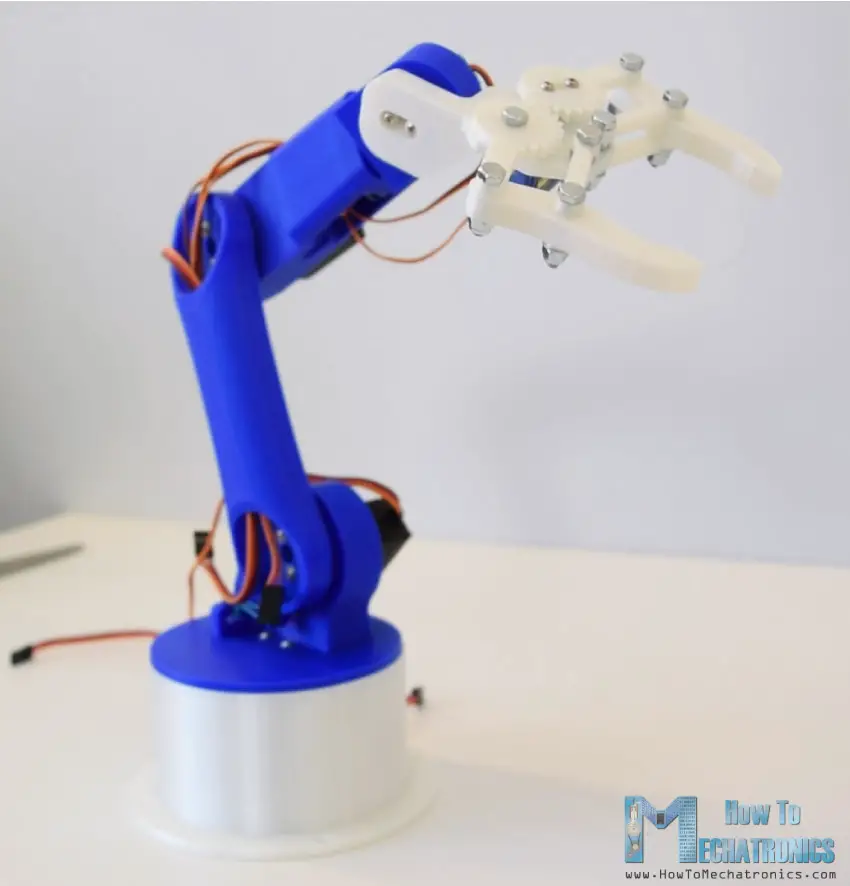
In similar way I continued to assemble the rest of the robot arm. As for the gripper mechanism I used some 4 millimeters bolts and nuts to assembly it.
Finally I attached the gripper mechanism onto the last servo and the Arduino robot arm was completed.
Arduino Robot Arm Circuit Diagram
The next stage is connecting the electronics. The circuit diagram of this project is actually quite simple. We just need an Arduino board and a HC-05 Bluetooth module for communication with the smartphone. The control pins of the six servo motors are connected to six digital pins of the Arduino board.

For powering the servos we need 5V, but this must come from an external power source because the Arduino is not able to handle the amount of current that all of them can draw. The power source must be able to handle at least 2A of current. So once we have connected everything together we can move on to programing the Arduino and make the Android app.
You can get the components needed for this example from the links below:
- MG996R Servo Motor …………………………. Amazon / Banggood
- HC-05 Bluetooth Module …………………..… Amazon / Banggood
- Arduino Board ……………………………………. Amazon / Banggood
- 5V 2A DC Power Supply …………………..….. Amazon / Banggood
*Please note: These are affiliate links. I may make a commission if you buy the components through these links. I would appreciate your support in this way!
Arduino Robot Arm Code
As the code is a bit longer, for better understanding, I will post the source code of the program in sections with description for each section. And at the end of this article I will post the complete source code.
So first we need to include the SoftwareSerial library for the serial communication of the Bluetooth module as well as the servo library. Both of these libraries are included with the Arduino IDE so you don’t have to install them externally. Then we need to define the six servos, the HC-05 Bluetooth module and some variables for storing the current and previous position of the servos, as well as arrays for storing the positions or the steps for the automatic mode.
#include <SoftwareSerial.h>
#include <Servo.h>

Servo servo01;
Servo servo02;
Servo servo03;
Servo servo04;
Servo servo05;
Servo servo06;

SoftwareSerial Bluetooth(3, 4); // Arduino(RX, TX) - HC-05 Bluetooth (TX, RX)

int servo1Pos, servo2Pos, servo3Pos, servo4Pos, servo5Pos, servo6Pos; // current position
int servo1PPos, servo2PPos, servo3PPos, servo4PPos, servo5PPos, servo6PPos; // previous position
int servo01SP[50], servo02SP[50], servo03SP[50], servo04SP[50], servo05SP[50], servo06SP[50]; // for storing positions/steps
int speedDelay = 20;
int index = 0;
String dataIn = "";
In the setup section we need to initialize the servos and the Bluetooth module and move the robot arm to its initial position. We do that using the write() function which simply moves the servo to any position from 0 to 180 degrees.
void setup() {
  servo01.attach(5);
  servo02.attach(6);
  servo03.attach(7);
  servo04.attach(8);
  servo05.attach(9);
  servo06.attach(10);
  Bluetooth.begin(38400); // Default baud rate of the Bluetooth module
  Bluetooth.setTimeout(1);
  delay(20);
  // Robot arm initial position
  servo1PPos = 90;
  servo01.write(servo1PPos);
  servo2PPos = 150;
  servo02.write(servo2PPos);
  servo3PPos = 35;
  servo03.write(servo3PPos);
  servo4PPos = 140;
  servo04.write(servo4PPos);
  servo5PPos = 85;
  servo05.write(servo5PPos);
  servo6PPos = 80;
  servo06.write(servo6PPos);
}
Next, in the loop section, using the Bluetooth.available() function , we constantly check whether there is any incoming data from the Smartphone. If true, using the readString() function we read the data as string an store it into the dataIn variable. Depending on the arrived data we will tell robot arm what to do.
// Check for incoming data
  if (Bluetooth.available() > 0) {
    dataIn = Bluetooth.readString();  // Read the data as string
Arduino Robot Arm Control Android App
Let’s take a look at the Android app now and see what kind of data it is actually sending to the Arduino.
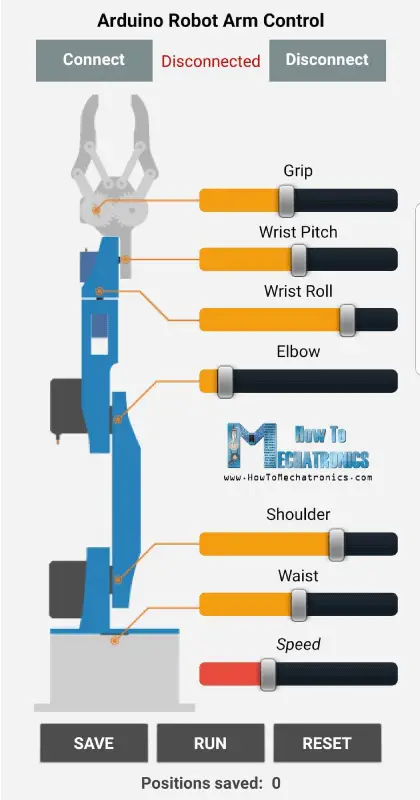
I made the app using the MIT App Inventor online application and here’s how it works. At the top we have two buttons for connecting the smartphone to the HC-05 Bluetooth module. Then on the left side we have an image of the robot arm, and on the right side we have the six slider for controlling the servos and one slider for the speed control.
Each slider have different initial, minimum and maximum value that suits the robot arm joints. At the bottom of the app, we have three button, SAVE, RUN and RESET through which we can program the robot arm to run automatically. There is also a label below which shows the number of steps we have saved. Nevertheless, for more details how to build apps like this using the MIT App Inventor you can check my other detailed tutorial for it.
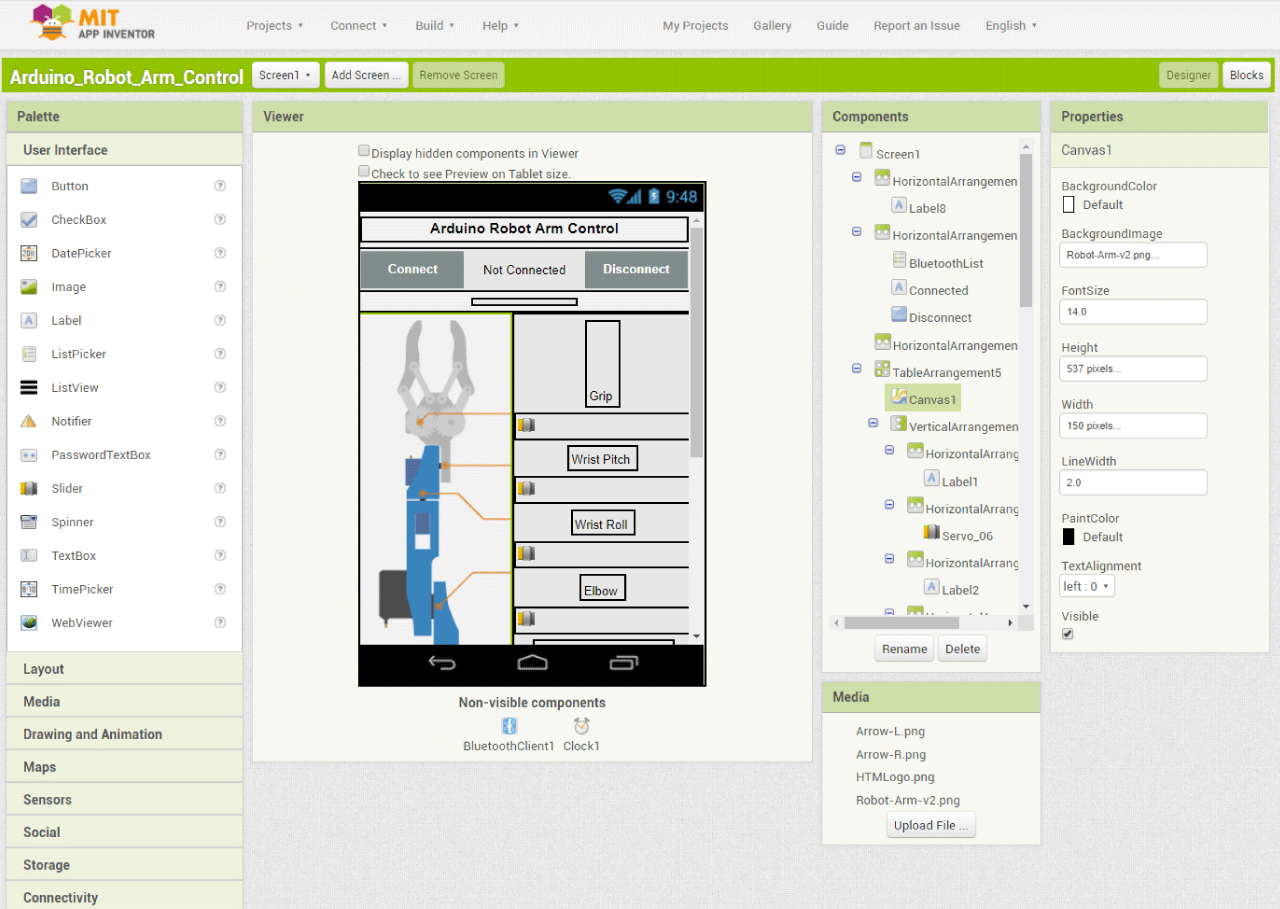
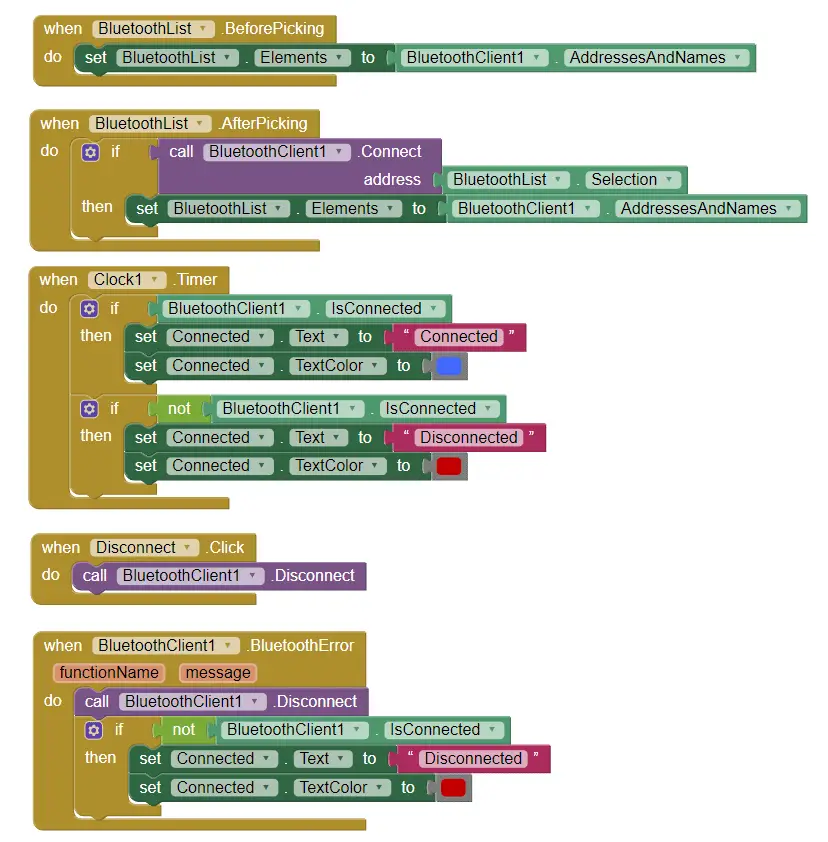
Ok, now let’s see the program or the blocks behind the application. First, on the left side we have the blocks for connecting the smartphone to the Bluetooth module.
Then we have the sliders blocks for the servo position control and the buttons blocks for programing the robot arm. So if we change the position of the slider, using the Bluetooth function .SendText, we send a text to the Arduino. This text consist of a prefix which indicates which slider has been changed as well as the current value of the slider.
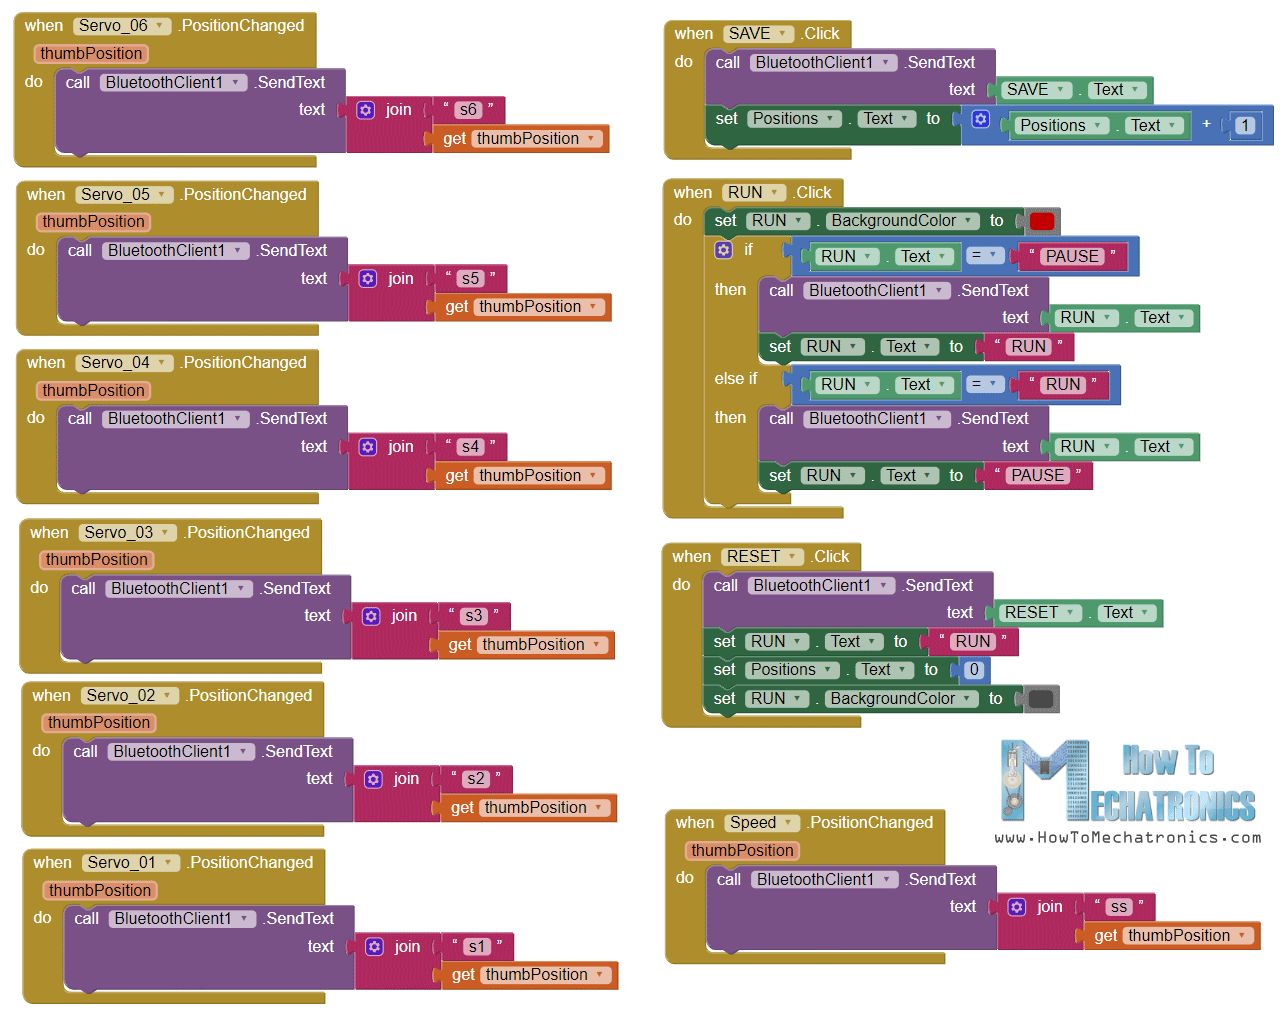
So therefore, at the Arduino, using the startsWith() function we check the prefix of each incoming data and so we know what do to next. For example, if the prefix is “s1” we know that we need to move the servo number one. Using the substring() function we get the remaining text, or that’s the position value, we convert it into integer and use the value to move the servo to that position.
// If "Waist" slider has changed value - Move Servo 1 to position
    if (dataIn.startsWith("s1")) {
      String dataInS = dataIn.substring(2, dataIn.length()); // Extract only the number. E.g. from "s1120" to "120"
      servo1Pos = dataInS.toInt();  // Convert the string into integer
Here we can simply call the write() function and the servo will go to that position, but in that way the servo would run at its maximum speed which is too much for the robot arm. Instead we need to control the speed of the servos so I used some FOR loops in order to gradually move the servo from the previous to the current position by implementing a delay time between each iteration. By changing the delay time you can change the speed of the servo.
// We use for loops so we can control the speed of the servo
      // If previous position is bigger then current position
      if (servo1PPos > servo1Pos) {
        for ( int j = servo1PPos; j >= servo1Pos; j--) {   // Run servo down
          servo01.write(j);
          delay(20);    // defines the speed at which the servo rotates
        }
      }
      // If previous position is smaller then current position
      if (servo1PPos < servo1Pos) {
        for ( int j = servo1PPos; j <= servo1Pos; j++) {   // Run servo up
          servo01.write(j);
          delay(20);
        }
      }
      servo1PPos = servo1Pos;   // set current position as previous position
    }
The same method is used for driving each axis of the robot arm.
Below them is the SAVE button. If we press the SAVE button, the position of each servo motor is stored in an array. With each pressing the index increases so the array is filled step by step.
// If button "SAVE" is pressed
    if (dataIn.startsWith("SAVE")) {
      servo01SP[index] = servo1PPos;  // save position into the array
      servo02SP[index] = servo2PPos;
      servo03SP[index] = servo3PPos;
      servo04SP[index] = servo4PPos;
      servo05SP[index] = servo5PPos;
      servo06SP[index] = servo6PPos;
      index++;                        // Increase the array index
    }
Then if we press the RUN button we call the runservo() custom function which runs stored steps. Let’s take a look at this function. So here we run the stored steps over and over again until we press the RESET button. Using the FOR loop we run through all positions stored in the arrays and at the same time we check whether we have any incoming data from the smartphone. This data can be the RUN/PAUSE button, which pauses the robot, and if clicked again continues with the automatic movements. Also if we change the speed slider position, we will use that value to change the delay time between each iteration in the FOR loops below, which controls the speed of the servo motors.
// Automatic mode custom function - run the saved steps
void runservo() {
  while (dataIn != "RESET") {   // Run the steps over and over again until "RESET" button is pressed
    for (int i = 0; i <= index - 2; i++) {  // Run through all steps(index)
      if (Bluetooth.available() > 0) {      // Check for incomding data
        dataIn = Bluetooth.readString();
        if ( dataIn == "PAUSE") {           // If button "PAUSE" is pressed
          while (dataIn != "RUN") {         // Wait until "RUN" is pressed again
            if (Bluetooth.available() > 0) {
              dataIn = Bluetooth.readString();
              if ( dataIn == "RESET") {
                break;
              }
            }
          }
        }
        // If SPEED slider is changed
        if (dataIn.startsWith("ss")) {
          String dataInS = dataIn.substring(2, dataIn.length());
          speedDelay = dataInS.toInt(); // Change servo speed (delay time)
        }
      }
      // Servo 1
      if (servo01SP[i] == servo01SP[i + 1]) {
      }
      if (servo01SP[i] > servo01SP[i + 1]) {
        for ( int j = servo01SP[i]; j >= servo01SP[i + 1]; j--) {
          servo01.write(j);
          delay(speedDelay);
        }
      }
      if (servo01SP[i] < servo01SP[i + 1]) {
        for ( int j = servo01SP[i]; j <= servo01SP[i + 1]; j++) {
          servo01.write(j);
          delay(speedDelay);
        }
      }
In similar way as explained earlier with these IF statements and FOR loops we move the servos to their next position. Finally if we press the RESET button we will clear all the data from the arrays to zero and also reset the index to zero so we can reprogram the robot arm with new movements.
// If button "RESET" is pressed
    if ( dataIn == "RESET") {
      memset(servo01SP, 0, sizeof(servo01SP)); // Clear the array data to 0
      memset(servo02SP, 0, sizeof(servo02SP));
      memset(servo03SP, 0, sizeof(servo03SP));
      memset(servo04SP, 0, sizeof(servo04SP));
      memset(servo05SP, 0, sizeof(servo05SP));
      memset(servo06SP, 0, sizeof(servo06SP));
      index = 0;  // Index to 0
    }
And that’s it, now we can enjoy and have some fun with the robot arm.
Here’s the complete code of the Arduino Robot Arm:
/*
       DIY Arduino Robot Arm Smartphone Control
        by Dejan, www.HowToMechatronics.com
*/

#include <SoftwareSerial.h>
#include <Servo.h>

Servo servo01;
Servo servo02;
Servo servo03;
Servo servo04;
Servo servo05;
Servo servo06;

SoftwareSerial Bluetooth(3, 4); // Arduino(RX, TX) - HC-05 Bluetooth (TX, RX)

int servo1Pos, servo2Pos, servo3Pos, servo4Pos, servo5Pos, servo6Pos; // current position
int servo1PPos, servo2PPos, servo3PPos, servo4PPos, servo5PPos, servo6PPos; // previous position
int servo01SP[50], servo02SP[50], servo03SP[50], servo04SP[50], servo05SP[50], servo06SP[50]; // for storing positions/steps
int speedDelay = 20;
int index = 0;
String dataIn = "";

void setup() {
  servo01.attach(5);
  servo02.attach(6);
  servo03.attach(7);
  servo04.attach(8);
  servo05.attach(9);
  servo06.attach(10);
  Bluetooth.begin(38400); // Default baud rate of the Bluetooth module
  Bluetooth.setTimeout(1);
  delay(20);
  // Robot arm initial position
  servo1PPos = 90;
  servo01.write(servo1PPos);
  servo2PPos = 150;
  servo02.write(servo2PPos);
  servo3PPos = 35;
  servo03.write(servo3PPos);
  servo4PPos = 140;
  servo04.write(servo4PPos);
  servo5PPos = 85;
  servo05.write(servo5PPos);
  servo6PPos = 80;
  servo06.write(servo6PPos);
}

void loop() {
  // Check for incoming data
  if (Bluetooth.available() > 0) {
    dataIn = Bluetooth.readString();  // Read the data as string

    // If "Waist" slider has changed value - Move Servo 1 to position
    if (dataIn.startsWith("s1")) {
      String dataInS = dataIn.substring(2, dataIn.length()); // Extract only the number. E.g. from "s1120" to "120"
      servo1Pos = dataInS.toInt();  // Convert the string into integer
      // We use for loops so we can control the speed of the servo
      // If previous position is bigger then current position
      if (servo1PPos > servo1Pos) {
        for ( int j = servo1PPos; j >= servo1Pos; j--) {   // Run servo down
          servo01.write(j);
          delay(20);    // defines the speed at which the servo rotates
        }
      }
      // If previous position is smaller then current position
      if (servo1PPos < servo1Pos) {
        for ( int j = servo1PPos; j <= servo1Pos; j++) {   // Run servo up
          servo01.write(j);
          delay(20);
        }
      }
      servo1PPos = servo1Pos;   // set current position as previous position
    }

    // Move Servo 2
    if (dataIn.startsWith("s2")) {
      String dataInS = dataIn.substring(2, dataIn.length());
      servo2Pos = dataInS.toInt();

      if (servo2PPos > servo2Pos) {
        for ( int j = servo2PPos; j >= servo2Pos; j--) {
          servo02.write(j);
          delay(50);
        }
      }
      if (servo2PPos < servo2Pos) {
        for ( int j = servo2PPos; j <= servo2Pos; j++) {
          servo02.write(j);
          delay(50);
        }
      }
      servo2PPos = servo2Pos;
    }
    // Move Servo 3
    if (dataIn.startsWith("s3")) {
      String dataInS = dataIn.substring(2, dataIn.length());
      servo3Pos = dataInS.toInt();
      if (servo3PPos > servo3Pos) {
        for ( int j = servo3PPos; j >= servo3Pos; j--) {
          servo03.write(j);
          delay(30);
        }
      }
      if (servo3PPos < servo3Pos) {
        for ( int j = servo3PPos; j <= servo3Pos; j++) {
          servo03.write(j);
          delay(30);
        }
      }
      servo3PPos = servo3Pos;
    }
    // Move Servo 4
    if (dataIn.startsWith("s4")) {
      String dataInS = dataIn.substring(2, dataIn.length());
      servo4Pos = dataInS.toInt();
      if (servo4PPos > servo4Pos) {
        for ( int j = servo4PPos; j >= servo4Pos; j--) {
          servo04.write(j);
          delay(30);
        }
      }
      if (servo4PPos < servo4Pos) {
        for ( int j = servo4PPos; j <= servo4Pos; j++) {
          servo04.write(j);
          delay(30);
        }
      }
      servo4PPos = servo4Pos;
    }
    // Move Servo 5
    if (dataIn.startsWith("s5")) {
      String dataInS = dataIn.substring(2, dataIn.length());
      servo5Pos = dataInS.toInt();
      if (servo5PPos > servo5Pos) {
        for ( int j = servo5PPos; j >= servo5Pos; j--) {
          servo05.write(j);
          delay(30);
        }
      }
      if (servo5PPos < servo5Pos) {
        for ( int j = servo5PPos; j <= servo5Pos; j++) {
          servo05.write(j);
          delay(30);
        }
      }
      servo5PPos = servo5Pos;
    }
    // Move Servo 6
    if (dataIn.startsWith("s6")) {
      String dataInS = dataIn.substring(2, dataIn.length());
      servo6Pos = dataInS.toInt();
      if (servo6PPos > servo6Pos) {
        for ( int j = servo6PPos; j >= servo6Pos; j--) {
          servo06.write(j);
          delay(30);
        }
      }
      if (servo6PPos < servo6Pos) {
        for ( int j = servo6PPos; j <= servo6Pos; j++) {
          servo06.write(j);
          delay(30);
        }
      }
      servo6PPos = servo6Pos;
    }
    // If button "SAVE" is pressed
    if (dataIn.startsWith("SAVE")) {
      servo01SP[index] = servo1PPos;  // save position into the array
      servo02SP[index] = servo2PPos;
      servo03SP[index] = servo3PPos;
      servo04SP[index] = servo4PPos;
      servo05SP[index] = servo5PPos;
      servo06SP[index] = servo6PPos;
      index++;                        // Increase the array index
    }
    // If button "RUN" is pressed
    if (dataIn.startsWith("RUN")) {
      runservo();  // Automatic mode - run the saved steps
    }
    // If button "RESET" is pressed
    if ( dataIn == "RESET") {
      memset(servo01SP, 0, sizeof(servo01SP)); // Clear the array data to 0
      memset(servo02SP, 0, sizeof(servo02SP));
      memset(servo03SP, 0, sizeof(servo03SP));
      memset(servo04SP, 0, sizeof(servo04SP));
      memset(servo05SP, 0, sizeof(servo05SP));
      memset(servo06SP, 0, sizeof(servo06SP));
      index = 0;  // Index to 0
    }
  }
}

// Automatic mode custom function - run the saved steps
void runservo() {
  while (dataIn != "RESET") {   // Run the steps over and over again until "RESET" button is pressed
    for (int i = 0; i <= index - 2; i++) {  // Run through all steps(index)
      if (Bluetooth.available() > 0) {      // Check for incomding data
        dataIn = Bluetooth.readString();
        if ( dataIn == "PAUSE") {           // If button "PAUSE" is pressed
          while (dataIn != "RUN") {         // Wait until "RUN" is pressed again
            if (Bluetooth.available() > 0) {
              dataIn = Bluetooth.readString();
              if ( dataIn == "RESET") {
                break;
              }
            }
          }
        }
        // If speed slider is changed
        if (dataIn.startsWith("ss")) {
          String dataInS = dataIn.substring(2, dataIn.length());
          speedDelay = dataInS.toInt(); // Change servo speed (delay time)
        }
      }
      // Servo 1
      if (servo01SP[i] == servo01SP[i + 1]) {
      }
      if (servo01SP[i] > servo01SP[i + 1]) {
        for ( int j = servo01SP[i]; j >= servo01SP[i + 1]; j--) {
          servo01.write(j);
          delay(speedDelay);
        }
      }
      if (servo01SP[i] < servo01SP[i + 1]) {
        for ( int j = servo01SP[i]; j <= servo01SP[i + 1]; j++) {
          servo01.write(j);
          delay(speedDelay);
        }
      }

      // Servo 2
      if (servo02SP[i] == servo02SP[i + 1]) {
      }
      if (servo02SP[i] > servo02SP[i + 1]) {
        for ( int j = servo02SP[i]; j >= servo02SP[i + 1]; j--) {
          servo02.write(j);
          delay(speedDelay);
        }
      }
      if (servo02SP[i] < servo02SP[i + 1]) {
        for ( int j = servo02SP[i]; j <= servo02SP[i + 1]; j++) {
          servo02.write(j);
          delay(speedDelay);
        }
      }

      // Servo 3
      if (servo03SP[i] == servo03SP[i + 1]) {
      }
      if (servo03SP[i] > servo03SP[i + 1]) {
        for ( int j = servo03SP[i]; j >= servo03SP[i + 1]; j--) {
          servo03.write(j);
          delay(speedDelay);
        }
      }
      if (servo03SP[i] < servo03SP[i + 1]) {
        for ( int j = servo03SP[i]; j <= servo03SP[i + 1]; j++) {
          servo03.write(j);
          delay(speedDelay);
        }
      }

      // Servo 4
      if (servo04SP[i] == servo04SP[i + 1]) {
      }
      if (servo04SP[i] > servo04SP[i + 1]) {
        for ( int j = servo04SP[i]; j >= servo04SP[i + 1]; j--) {
          servo04.write(j);
          delay(speedDelay);
        }
      }
      if (servo04SP[i] < servo04SP[i + 1]) {
        for ( int j = servo04SP[i]; j <= servo04SP[i + 1]; j++) {
          servo04.write(j);
          delay(speedDelay);
        }
      }

      // Servo 5
      if (servo05SP[i] == servo05SP[i + 1]) {
      }
      if (servo05SP[i] > servo05SP[i + 1]) {
        for ( int j = servo05SP[i]; j >= servo05SP[i + 1]; j--) {
          servo05.write(j);
          delay(speedDelay);
        }
      }
      if (servo05SP[i] < servo05SP[i + 1]) {
        for ( int j = servo05SP[i]; j <= servo05SP[i + 1]; j++) {
          servo05.write(j);
          delay(speedDelay);
        }
      }

      // Servo 6
      if (servo06SP[i] == servo06SP[i + 1]) {
      }
      if (servo06SP[i] > servo06SP[i + 1]) {
        for ( int j = servo06SP[i]; j >= servo06SP[i + 1]; j--) {
          servo06.write(j);
          delay(speedDelay);
        }
      }
      if (servo06SP[i] < servo06SP[i + 1]) {
        for ( int j = servo06SP[i]; j <= servo06SP[i + 1]; j++) {
          servo06.write(j);
          delay(speedDelay);
        }
      }
    }
  }
}
I hope you liked this video and learned something new. Feel free to ask any question in the comments section below and check my Arduino Projects Collection.
The post DIY Arduino Robot Arm with Smartphone Control appeared first on HowToMechatronics.
from HowToMechatronics https://ift.tt/2O7hkAV


No comments:
Post a Comment